Your vehicle’s braking system is its most critical safety feature. Regular Toyota brake maintenance isn’t just about preventing costly repairs—it’s about protecting you and your passengers on every journey. When you press that brake pedal, you need absolute confidence that your vehicle will respond immediately.
The Toyota brake system is engineered for reliability, but even the best components require periodic attention. Certified technicians at your local dealership have the specialized training and equipment to perform comprehensive inspections that identify potential issues before they become dangerous problems.
These professionals examine everything from pad thickness and rotor condition to fluid levels and line integrity. Their expertise ensures your vehicle maintains proper stopping power in all driving conditions—whether you’re navigating busy city streets or making an emergency stop on the highway.
Beyond safety, regular brake service extends component life and preserves your vehicle’s value. Catching minor issues early prevents the domino effect of damage that occurs when worn parts stress other components. Think of maintenance as an investment that pays dividends in both peace of mind and long-term savings.
The Critical Importance of Brake Maintenance
Keeping your Toyota’s brakes in check is more than just car care. It’s a key investment in your safety and your car’s life span. Your brakes are your first line of defense against road dangers. So, regular brake maintenance is a must, not a choice.
Every Toyota has a service schedule that outlines when to check brakes, change fluids, and replace parts. Sticking to these guidelines helps keep your car’s stopping power strong when you need it most.
Safety Implications of Neglected Brakes
Ignoring brake upkeep can put you, your passengers, and others at risk. Worn-out brakes can make stopping much harder, sometimes by dozens of feet. This extra time can mean the difference between a close call and a crash.
Bad brakes can fail in scary ways:
- Sudden complete brake failure due to fluid leaks or line ruptures
- Unpredictable pulling to one side during braking
- Dangerous brake fade during extended downhill driving
- Increased hydroplaning risk due to poor braking response in wet conditions
Properly maintained brakes can prevent accidents in emergency situations. Quick reactions are crucial in such moments.
How Proper Maintenance Extends Brake Life
Regular brake service keeps you safe and saves money. Catching small problems early can avoid big repairs. For instance, replacing worn-out pads before they damage rotors can save a lot of money.
Good maintenance extends brake life in several ways:
- Early detection of caliper binding that causes uneven wear
- Regular fluid changes that prevent internal corrosion
- Timely pad replacements that protect expensive rotors
- Periodic system inspections that identify potential problems
Sticking to Toyota’s maintenance schedule can make brake components last 20-40% longer. This approach keeps your car’s value high and gives you peace of mind that your Toyota will stop reliably when needed.
Understanding Your Toyota Brake System
Toyota vehicles have advanced braking systems. They use precision engineering and reliable parts. When you press the brake pedal, it starts a hydraulic system. This system turns your foot pressure into stopping power.
The system works by hydraulic pressure moving from your foot to the wheels. Many parts work together in harmony. Toyota has improved this system over years to ensure reliable braking.

Components of Toyota Brake Systems
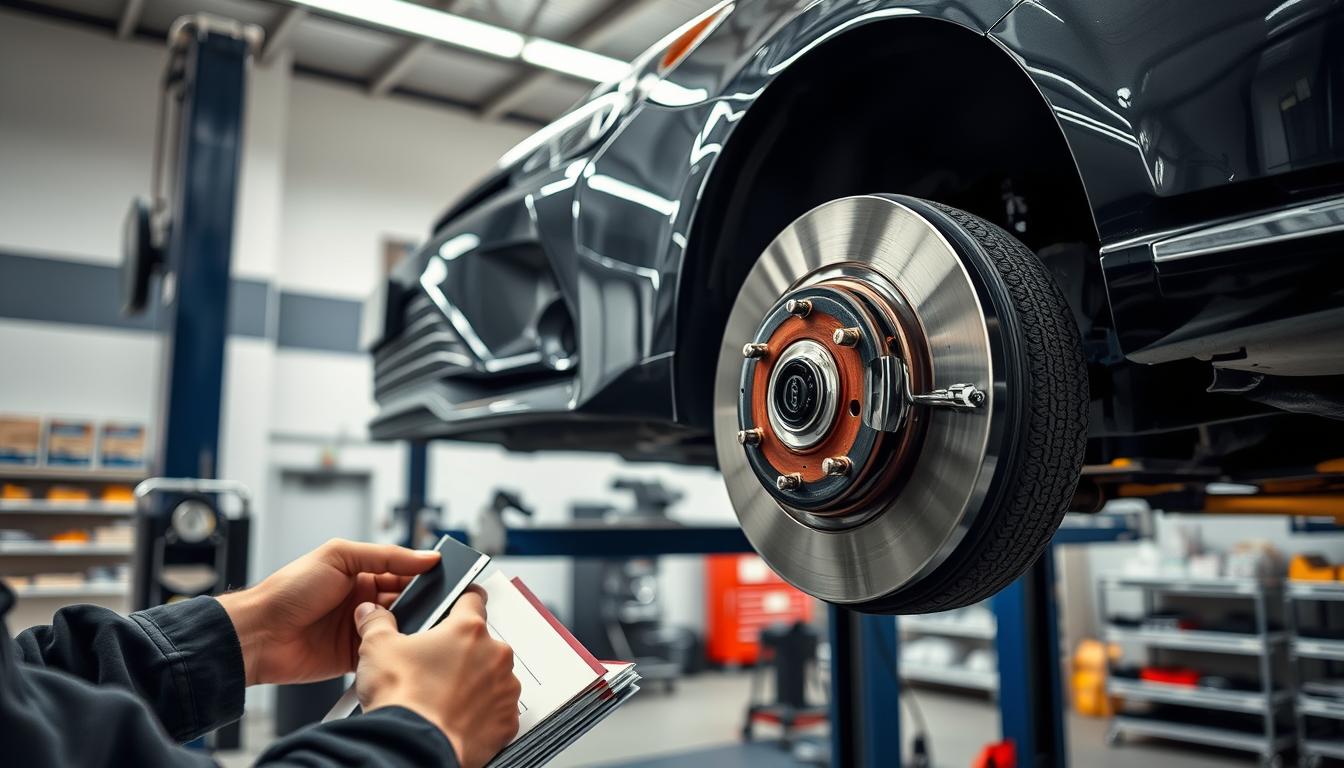
Your Toyota’s brakes have key parts for safe stopping. There are two main types: disc brakes and drum brakes. Most Toyotas have disc brakes on the front and drum brakes on the rear.
The brake system starts with the brake pedal. It connects to a master cylinder. When pressed, it creates pressure in the brake lines. This pressure goes to the calipers or wheel cylinders.
Disc Brake Components
Disc brakes are on the front wheels of all Toyotas and some rear wheels. They have:
- Brake rotors (or discs) – metal discs attached to the wheel hubs that rotate with the wheels
- Brake calipers – hydraulic clamps that squeeze the brake pads against the rotors
- Brake pads – friction material that presses against the rotors to create stopping force
- Caliper pistons – push the brake pads against the rotors when hydraulic pressure is applied
This system offers great stopping power and heat dissipation. It’s best for the front wheels where most braking happens.
Drum Brake Components
Drum brakes are in some Toyotas, especially on rear wheels of economy models. They include:
- Brake drums – bowl-shaped components that rotate with the wheels
- Wheel cylinders – apply hydraulic pressure to push the brake shoes outward
- Brake shoes – curved friction material that presses against the inner surface of the drums
- Return springs – pull the brake shoes back to their resting position when pressure is released
- Self-adjusters – mechanisms that maintain proper clearance between shoes and drums
Drum brakes are cost-effective and great for parking brakes. Toyota uses them in some models.
How Toyota Brakes Differ from Other Manufacturers
Toyota focuses on reliability and longevity in brake design. This approach makes their brakes stand out. They aim for consistent performance over flashy features.
Toyota uses thicker brake rotors than many others. This helps with heat dissipation and reduces warping. It adds to Toyota’s durability, even if it means a bit more weight.
Toyota’s brake pads offer a good balance. They provide stopping power, control noise, and last long. Toyota prioritizes consistent performance, not just initial bite or low dust.
Toyota’s electronic brake control systems are more conservative. Their ABS and VSC interventions are smoother. This reflects Toyota’s focus on predictable handling.
When you service your Toyota, technicians use special equipment. This ensures your brakes meet Toyota’s safety and performance standards.
Signs Your Toyota Needs Brake Service
Your Toyota’s brakes send out signals that you should know. Catching these signs early can stop small problems from getting big. It’s key to have regular Toyota brake inspections, but your car will also tell you when it needs help.
Pay attention to these signs to avoid brake failures and expensive fixes. Let’s look at the common signs that mean it’s time for Toyota brake service.
Audible Warning Signs
Your ears are the first to warn you of brake problems. Toyota’s brake systems have built-in wear indicators. These make sounds when it’s time for service.
Squealing and Grinding Noises
A squealing sound when you brake is not just annoying. It’s a sign from your car that brake pads need attention. Toyota brake pads start at eight to twelve millimeters thick. When they get to about 3 millimeters, it’s time to replace them.
Other Concerning Sounds
Listen for clicking, thumping, or rattling noises too. Clicking might mean loose parts, and thumping could be uneven rotors. Any odd sound while braking means it’s time for a Toyota brake inspection.
Physical Symptoms While Driving
How your Toyota brakes can tell you a lot. Watch for these signs that show brake problems.
Pedal Feel Changes
A good brake pedal feels firm and quick to respond. If it feels soft, sinks, or needs more pressure, you might have air or a leak. A hard pedal could mean a brake booster or master cylinder issue.
Vehicle Pulling or Vibration
If your Toyota pulls to one side while braking, it’s likely uneven pad wear or dirty brake fluid. Vibrations in the pedal mean warped rotors, often from heat or wear. Both need quick attention.
Visual Indicators of Brake Wear
Regular checks can catch brake problems early. Many Toyotas let you see brake parts without removing wheels. But, a full check might need wheel removal.
Look at brake pad thickness through the wheel spokes or inspection holes. The rotor should be smooth and even. Also, check the brake fluid reservoir for the right level and clarity.
Rust on rotors is normal after rain or washing. But, if it doesn’t go away, or if you see uneven wear, it’s time to check further. Catching these signs early can save you from bigger Toyota brake service needs later.
Essential Tools for Toyota Brake Maintenance
Getting the right tools is key for Toyota brake maintenance. Whether you’re a DIY expert or a weekend fixer, the right tools make the job safer and more reliable. Let’s look at the tools you need to keep your Toyota’s brakes in top shape.
Basic Hand Tools Required
Most brake maintenance tasks need common hand tools. Quality matters here, as bad tools can make simple jobs hard. You might already have these tools in your garage.
Here’s what you need for Toyota brake work:
- Socket set (both metric and SAE) with 3/8″ and 1/2″ drives ($30-$100)
- Combination wrench set, focusing on 12mm-19mm sizes ($25-$75)
- Torque wrench for proper bolt tightening ($40-$150)
- Screwdrivers (Phillips and flathead in various sizes) ($15-$30)
- Pliers set including needle-nose and channel-lock varieties ($20-$50)
- Rubber mallet for gentle persuasion without damage ($10-$15)
Toyota cars use metric fasteners, but having both metric and standard tools is smart. A good-quality jack and jack stands are also crucial for safety.
Specialized Equipment for Brake Work
For effective Toyota brake repair, you need specialized tools. These tools make the job easier and prevent damage.
A brake caliper compression tool ($15-$60) is essential for brake pad installation. A brake fluid tester ($5-$20) tells you when to change the fluid. A brake bleeder kit ($20-$100) makes removing air from the system easier.
Toyota-Specific Tools
Some Toyota models need special tools for brake maintenance. For example, the Toyota Camry and Avalon need a specific caliper bracket tool. Tacoma and Tundra trucks might need adapters for their large brake components.
Toyota’s rear disc brake systems have a unique parking brake mechanism. Special tools for this are available for $30-$100. These tools are worth it for long-term maintenance. Many Toyota fans find brake service kits save money in the long run.
Universal Brake Tools
There are universal brake tools that work on all Toyota models. A brake line wrench set ($15-$30) prevents damaged fittings. Brake pad spreaders ($10-$20) and a brake fluid catch container ($5-$15) are also useful. A brake system vacuum bleeder ($40-$100) makes fluid replacement easy by yourself.
Toyota Brake Maintenance: Step-by-Step Procedures
Following a step-by-step guide for Toyota brake maintenance helps keep your car safe and in good shape. Toyota suggests checking brakes every 5,000 miles or 6 months, whichever comes first. Brake lines and hoses get a detailed check every 10,000 miles. Brake fluid should be replaced every 20,000 miles.
Safety Precautions Before Starting
Always put safety first when working on your car’s brakes. Make sure the brakes are cool to avoid burns. Brakes can get very hot during driving.
It’s important to support your car properly. Never just use a jack. Always use jack stands that can hold your Toyota’s weight. Use wheel chocks on the opposite side of where you’re working to prevent the car from rolling.
Wearing the right protective gear is key for safe brake work:
- Safety glasses to protect against brake dust and debris
- Mechanic’s gloves to shield hands from sharp components
- Respiratory protection when cleaning brake parts
- Sturdy, closed-toe footwear
When working on cars with electronic parking brakes, disconnect the negative battery terminal. This prevents the brake from accidentally engaging.
Accessing Your Toyota’s Brake Components
To get to your Toyota’s brake system, you need to prepare carefully. Park on a level, solid surface and engage the parking brake (unless you’re working on the rear brakes). Loosen the lug nuts on the wheel you’ll be removing while the vehicle is still on the ground.

Use your owner’s manual to find the right jacking points for your Toyota. Wrong placement can damage parts or make the car unstable. Raise the car enough to remove the wheel, then use jack stands before you start.
Wheel Removal Process
Removing wheels safely is important for Toyota brake repair. Loosen the lug nuts with the car on the ground, then raise it and remove the nuts in a star or cross pattern.
Pull the wheel straight toward you to remove it. Be careful not to mess with the brake parts. Place the wheel flat under the car’s frame as an extra safety measure in case the jack stands fail.
When putting wheels back on, Toyota models need specific torque. Passenger cars usually need 76-89 ft-lbs, while SUVs and trucks need 83-110 ft-lbs.
Accessing Hard-to-Reach Areas
Some Toyotas are harder to work on than others. Rear drum brakes on RAV4 and Highlander models need special care because of their tight spaces.
For cars with electronic parking brakes, like newer Camry and Avalon models, you need to access the service mode through the infotainment system orbleed the brake systemusing a scan tool to retract the calipers.
Tacoma and Tundra models have extra skid plates or shields. You need to remove these to get to some brake parts. Keep track of all fasteners during removal.
Documentation and Record Keeping
Keeping detailed records of your Toyota brake maintenance is very important. It helps with future reference and warranty claims. Create a maintenance log that includes:
| Information to Record | Why It’s Important | Where to Store |
|---|---|---|
| Service date and mileage | Tracks maintenance intervals | Digital spreadsheet or app |
| Parts replaced (with part numbers) | Ensures correct replacements in future | Vehicle maintenance folder |
| Measurements (pad/rotor thickness) | Helps track wear patterns | Maintenance log book |
| Brake fluid type and brand | Prevents mixing incompatible fluids | Vehicle’s glove compartment |
| Torque specifications used | Ensures proper installation | Workshop reference guide |
Take “before” and “after” photos of components during major brake work. These visual records can be invaluable for comparing wear patterns over time or identifying recurring issues.
Keep all receipts for parts and fluids used in your maintenance. These documents not only help with budgeting but can be crucial for warranty claims if a component fails prematurely.
Maintaining this documentation creates a comprehensive service history that adds value to your Toyota if you decide to sell it, demonstrating your commitment to proper maintenance.
Inspecting and Replacing Toyota Brake Pads
Inspecting and replacing Toyota brake pads is a task that many DIY fans can do with the right help. It saves money and keeps your car’s brakes working well when you need them. Let’s look at how to do this important car maintenance job with confidence.

Measuring Pad Thickness
First, you need to measure your Toyota brake pad thickness. New pads are between eight to twelve millimeters thick. As you drive, the pads wear down, getting thinner.
To check thickness, look through the caliper window or remove the wheel for a closer look. Use a brake pad thickness gauge for exact measurements. The minimum safe thickness is 3 millimeters.
If your pads are thinner than 3mm, replace them immediately. Driving with thinner pads can damage your rotors, leading to expensive repairs and bad braking.
Removing Worn Pads
When you know your Toyota brake pads need replacing, remove the old ones carefully. The steps vary for front and rear brakes, but both need careful handling to avoid damage.
Start by making sure your car is on jack stands, wheels off, and brake pressure released. Always check your Toyota’s service manual for specific steps and torque values.
Front Brake Pad Removal
For front brake pads, remove the caliper guide pin bolts first. Lift the caliper off the rotor carefully, avoiding brake line damage. Use a bungee cord to keep the caliper secure.
Remove the pad retaining clips and slide out the worn pads. Check the caliper piston and bracket for damage or corrosion while the pads are out.
Rear Brake Pad Removal
Rear brake pads may need an extra step of retracting the caliper piston. Use a special tool to rotate and push the piston back into its bore.
After retracting the piston, remove the caliper bolts and lift the caliper off the rotor. Secure the caliper to prevent brake line stress. Remove any retaining hardware and slide out the worn pads. Be careful with any springs or clips specific to the rear brakes.
Installing New Brake Pads
Installing new Toyota brake pads requires precision for proper function and longevity. Clean the caliper bracket and contact points with a wire brush and brake cleaner. Apply a thin layer of brake lubricant to the caliper bracket, but not on the pad’s friction surface.
Install any new hardware from the brake pad kit to reduce noise and ensure proper pad movement. Position the new pads correctly in the caliper bracket, with wear indicators facing downward for most Toyota models.
Before putting the caliper back, make sure the piston is fully retracted for the thicker new pads. Place the caliper over the pads and reinstall the guide pin bolts, tightening to the manufacturer’s torque specification.
Proper Break-in Procedures
After installing new Toyota brake pads, a proper break-in is crucial for optimal performance. This process transfers pad material onto the rotor, improving braking and reducing noise.
Drive at moderate speeds (30-40 mph) and make 8-10 gentle stops, allowing 30 seconds between each stop for cooling. Then, make 2-3 moderate stops from 40-50 mph. Avoid hard braking during this time to allow the pads and rotors to cool gradually. After these steps, drive normally but avoid hard braking for the next 200 miles.
Quality Checks After Installation
Before driving your Toyota, do several quality checks. First, check that the brake pedal feels firm and consistent. Also, ensure the brake fluid level is between the minimum and maximum marks in the master cylinder reservoir.
With the wheels back on and the car safely lowered, test the brakes by applying moderate pressure to the pedal for 30 seconds. There should be no fade or sinking. During your first drives, listen for unusual noises and check the braking performance. Any pulling, vibration, or squealing needs immediate inspection.
Brake Rotor Maintenance and Replacement
Brake pads get a lot of attention, but your Toyota’s brake rotors are just as important. These metal discs work with your brake pads to stop your vehicle. If rotors are damaged, your brakes won’t work right, which is dangerous.
One sign of rotor trouble is feeling your brake pedal vibrate when you brake. This usually means the rotors are warped from too much heat or age. Fixing rotor problems quickly is key to keeping your Toyota’s brakes in top shape.
Inspecting Rotors for Damage
Checking your Toyota’s rotors regularly can help catch problems early. Look for these signs of wear:
- Scoring – Deep grooves or lines etched into the rotor surface
- Heat spots – Discolored areas (often bluish) indicating overheating
- Cracks – Any visible fractures, especially radiating from the center
- Rust – Excessive corrosion beyond the normal surface rust
Run your fingertip over the rotor surface. A smooth rotor should feel like glass. If it feels rough, it’s time for a professional check.

Measuring Rotor Thickness
Measuring your rotors’ thickness is also important. Toyota sets minimum thickness standards for each model. If rotors are too thin, they’re not safe.
To measure accurately, you’ll need a micrometer. Here’s how to use it:
- Make sure the vehicle is safe and the wheel is off
- Clean the rotor surface of any debris or rust
- Take measurements at several points around the rotor (at least 8 positions)
- Record the thinnest measurement found
Compare your measurement to the minimum thickness specified. If it’s too low, you need to replace the rotor.
Resurfacing vs. Replacing Rotors
When rotors show wear but are still thick enough, you have a choice. Should you resurface them or replace them? This decision affects your safety and your wallet.
Resurfacing removes a thin layer of metal to smooth out the rotor. It’s good for minor issues but reduces the rotor’s thickness. Replacing rotors is more expensive but gives you new components with a longer life.
| Factor | Resurfacing | Replacing | Best For |
|---|---|---|---|
| Initial Cost | $15-30 per rotor | $40-150+ per rotor | Resurfacing |
| Longevity | Reduced lifespan | Full service life | Replacing |
| Performance | Good if minimal material removed | Optimal braking performance | Replacing |
| Time Investment | Requires shop time for machining | Quick swap-out procedure | Varies by situation |
Toyota’s Recommendations by Model
Toyota has specific guidelines for rotor service. Camry and Corolla models can usually be resurfaced once. But SUVs like the RAV4 and Highlander, due to their weight, often need new rotors. Trucks like the Tacoma and Tundra, with their heavy loads, also benefit from new rotors.
Cost-Benefit Analysis
Resurfacing is cheaper upfront, but it’s not always the best value. New rotors can last 30,000-70,000 miles, while resurfaced ones might only last 15,000-30,000 miles. Considering labor costs, replacing rotors is often more cost-effective, especially for daily drivers.
New rotors also improve braking performance and safety. For family vehicles or those driven frequently, the benefits of new rotors outweigh the cost savings of resurfacing.
Toyota Brake Fluid: Maintenance and Replacement
Your Toyota’s brake fluid is key to safety and needs regular care. It helps your car stop by transferring force from the brake pedal to the calipers. Just like changing brake pads or rotors, keeping the fluid fresh is crucial. Toyota suggests checking it every 10,000 miles and replacing it every 20,000 miles for best braking.
Understanding Brake Fluid Types for Toyota Vehicles
Toyota cars need specific brake fluid types for safe braking. Most use DOT 3 or DOT 4 fluid. DOT 3 is good for everyday driving, while DOT 4 is better for heavy use like towing.
Using the wrong fluid can harm your car’s brakes. Always check your owner’s manual for the right type. Never mix different DOT fluids, as it can make braking unsafe.

Checking Brake Fluid Levels
It’s easy to check your Toyota’s brake fluid at home. The reservoir is on the driver’s side of the engine, near the firewall.
To check your brake fluid:
1. Park your Toyota on level ground with the engine off
2. Find the brake fluid reservoir, marked “MIN” and “MAX”
3. Look at the fluid level without opening the cap
4. Healthy fluid is clear to amber; dark fluid means it’s contaminated
5. If it’s low, add the correct fluid until it reaches “MAX”
Regular checks can spot leaks or problems early. If the level keeps dropping, look for leaks or get help from a pro.
Complete Brake Fluid Flush Procedure
A brake fluid flush removes old fluid and adds new, keeping your brakes working well. Over time, brake fluid absorbs moisture, which can cause it to boil too easily.
To flush brake fluid, you’ll need:
– The right brake fluid for your Toyota
– A brake bleeder wrench or vacuum bleeder
– Clear tubing
– A catch container
– A helper
– Clean rags
Start by removing old fluid from the reservoir with a turkey baster or syringe. Then, refill with fresh fluid. Next, bleed each brake line to remove old fluid and air bubbles.
Bleeding Sequence for Toyota Models
Toyota vehicles need a specific bleeding order to remove air properly. Most follow this sequence:
1. Right rear brake
2. Left rear brake
3. Right front brake
4. Left front brake
This order follows the hydraulic path from farthest to closest from the master cylinder. Some Toyota SUVs and trucks may have a different sequence. Always check your service manual for the correct order.
Avoiding Common Mistakes
When doing brake fluid maintenance, avoid these mistakes:
– Never reuse old brake fluid or leave the reservoir cap off for long
– Don’t let the master cylinder run dry during bleeding
– Avoid splashing fluid on painted surfaces
– Never mix DOT fluid types or use old fluid
– Don’t skip regular fluid checks
| Brake Fluid Type | Boiling Point | Toyota Applications | Replacement Interval |
|---|---|---|---|
| DOT 3 | 401°F (dry) | Corolla, Camry, RAV4 (standard) | Every 2 years/20,000 miles |
| DOT 4 | 446°F (dry) | GR86, Supra, Tundra (towing) | Every 2 years/20,000 miles |
| DOT 5.1 | 500°F (dry) | Performance upgrades, heavy duty | Every 1-2 years |
Maintaining Toyota Brake Calipers
Toyota brake calipers are key to your car’s stopping power. They house the brake pads and apply pressure to the rotors when you press the brake pedal. Keeping them in good shape ensures even pad wear, responsive braking, and your safety on the road. Let’s look at how to keep your Toyota brake system in top shape.
Inspecting Caliper Function
Regularly checking your Toyota’s brake calipers can prevent expensive repairs and dangerous brake failures. Start by looking for any fluid leaks around the piston seals. Brake fluid leaks show up as oily residue and mean the seals are wearing out.
Check for uneven brake pad wear, which often means a sticking caliper. If one pad is much thinner than the other, the caliper might not be working right. Also, look for corrosion or damage to the caliper body and mounting brackets.

During a test drive, notice if the car pulls to one side when braking or if the brake pedal feels unusual. These signs often mean you need to check the calipers. Many Toyota service centers offer free brake inspections that check the calipers.
Lubricating Caliper Slides
It’s important to keep the caliper slide pins well-lubricated for even braking. These pins let the caliper move freely, ensuring the brake pads and rotor make even contact. Over time, the lubricant can dry out or get dirty from road grime.
To lubricate the slides, first remove the caliper bracket bolts with the right socket. Then, take out the slide pins and clean them with brake cleaner to get rid of old grease and debris. Check the rubber boots for tears or wear and replace them if needed.
Put a thin layer of high-temperature silicone-based brake lubricant on the slides. Use a lubricant made for Toyota vehicles. Avoid regular grease, as it can melt under braking heat. Properly lubricated slides help prevent uneven pad wear and extend your Toyota brake system‘s life.
Rebuilding vs. Replacing Calipers
When dealing with caliper problems, you might choose to rebuild or replace them. Rebuilding means taking the caliper apart, replacing seals, pistons, and boots, and then putting it back together with new parts. This is often cheaper but needs mechanical skill and special tools.
Replacing with new or remanufactured calipers is more reliable and convenient. Genuine Toyota brake parts are made for your vehicle model, ensuring a perfect fit and performance. While more costly at first, new calipers usually come with warranties and avoid rebuilding risks.
Think about your vehicle’s age and value when deciding. For newer Toyotas or those you plan to keep, investing in quality replacement calipers is often better in the long run. Many Toyota brake service centers offer both options and can help you choose the best one for your situation.
Troubleshooting Common Toyota Brake Issues
Dealing with brake problems in your Toyota can be stressful. But, by following a step-by-step approach, you can find solutions. Most brake issues show warning signs before they get worse. Knowing these signs can help avoid bigger problems with your Toyota brake system.
Let’s look at how to diagnose and fix common brake issues that Toyota owners face.
Diagnosing Brake System Problems
Fixing your Toyota’s brakes starts with finding the problem. Toyota vehicles use two ways to diagnose issues: built-in systems and manual checks.
Using Toyota’s Built-in Diagnostics
Modern Toyotas have advanced diagnostic systems. If your dashboard lights up with the ABS or brake warning, it’s trying to tell you something. These lights often show specific codes that an OBD-II scanner can read.
Newer Toyotas might show brake system details on the Multi-Information Display (MID). Some high-end models even have real-time brake pad wear indicators.
Manual Troubleshooting Methods
Older Toyotas or when electronic checks don’t work, manual checks are key. Start by visually inspecting brake parts for wear or damage. Listen for unusual sounds when braking—squealing means worn pads, and grinding means metal-on-metal.

A test drive can also reveal issues. Notice how the pedal feels, the stopping distance, and how the car brakes. A soft pedal might mean air in the lines, and vibration could be warped rotors.
Solutions for Typical Toyota Brake Complaints
Once you know the problem, finding a solution is easier. Toyota vehicles face many common brake issues, but some are specific to certain models.
Model-Specific Issues
Some Toyota models have unique brake problems. For example, 2007-2011 Camry models might wear out rear brake pads faster. RAV4 models from 2006-2012 might have soft brake pedals due to master cylinder issues.
Prius owners might notice different regenerative braking. Tacoma and Tundra trucks, especially when towing, might need stronger brakes than standard.
Universal Toyota Brake Fixes
Many brake problems affect all Toyotas. If your car pulls to one side, it’s likely due to uneven brake linings or dirty brake fluid. This calls for checking the calipers and pads, and possibly a fluid change.
Squealing brakes can be fixed with caliper slide pin lubrication and brake-quiet compound. Vibration during braking usually means the rotors need resurfacing or replacing.
Regular maintenance is the best way to avoid brake problems. Change brake fluid every 30,000 miles and check pads and rotors at each tire rotation. This keeps your Toyota brake system in top shape and safe.
Toyota Brake Maintenance Schedule by Model
Keeping your Toyota’s brakes in top shape is key for safety and reliability. Each Toyota model has its own brake care needs, based on its size and how you use it. Toyota suggests a brake check with every oil change, which is usually every 5,000 miles or 6 months, whichever comes first.
At 10,000 miles, it’s time to check brake lines and hoses. And at 20,000 miles, you might need to replace the brake fluid if it’s needed.
Camry and Corolla Brake Service Intervals
The Camry and Corolla, being lighter, need brake checks less often. Brake pad inspections are recommended every 5,000 miles. They usually last between 30,000 and 50,000 miles, depending on how you drive.
Hybrid versions, like the Camry Hybrid, might go longer between checks because of their regenerative braking. This system helps reduce wear on brake parts.
Drivers in the city might need to check their brakes more often because of all the stopping. But those who mostly drive on highways might go a bit longer between checks. Always check the brake fluid during service and replace it every 30,000 miles to keep your brakes working well.

RAV4 and Highlander Maintenance Needs
The RAV4 and Highlander, being heavier and used for towing, need more attention to their brakes. They usually need brake pad replacements between 25,000 and 40,000 miles. If you drive in hilly areas or tow a lot, check your brakes every 3,000-4,000 miles instead.
The Highlander, being heavier, wears out its front brake pads faster. Both models should have rotor checks every 15,000 miles. You might need to resurface or replace them every other pad change. Don’t forget to flush the brake fluid every 25,000 miles to keep your brakes efficient.
Tacoma and Tundra Heavy-Duty Considerations
The Tacoma and Tundra need the most careful brake maintenance because of their heavy-duty use. They should have brake inspections every 5,000 miles. But if you tow, haul heavy loads, or go off-roading, check them every 3,000 miles. Brake pads on these trucks can last 20,000-35,000 miles, depending on how you use them.
Off-road drivers should clean and lubricate their calipers often to prevent wear from dirt and debris. Trucks used for towing should have their brake fluid flushed every 20,000 miles to keep it working well under heavy loads.
| Toyota Model | Inspection Interval | Typical Pad Life | Fluid Change | Special Considerations |
|---|---|---|---|---|
| Camry/Corolla | 5,000 miles | 30,000-50,000 miles | 30,000 miles | Hybrids extend pad life |
| RAV4/Highlander | 5,000 miles | 25,000-40,000 miles | 25,000 miles | Reduce intervals if towing |
| Tacoma/Tundra | 3,000-5,000 miles | 20,000-35,000 miles | 20,000 miles | More frequent if off-roading |
DIY vs. Professional Toyota Brake Service
Deciding between DIY brake maintenance and professional service depends on your skills and comfort. The right choice ensures your safety and your car’s braking system lasts longer. Let’s look at when each option is best for Toyota owners.
When to Tackle Brake Maintenance Yourself
DIY brake work can save money and be rewarding if you have basic mechanical skills. Simple tasks like inspecting brake pads and checking fluid levels are safe for beginners. You just need basic tools.
Replacing brake pads and bleeding the brake system are more advanced tasks. They need more tools and knowledge but are still doable for DIY enthusiasts. The main benefit is saving on labor costs, which can be a lot for brake work.
But, know your limits. Tasks like caliper rebuilding or ABS system repairs need special tools and knowledge. If unsure, it’s safer to get help from a professional Toyota brake service technician.
Finding a Qualified Toyota Brake Specialist
When you need professional help, finding a qualified Toyota brake specialist is key. Look for technicians with Toyota experience and ASE certification in brake systems. A good specialist will do thorough inspections and explain their findings clearly before starting work.
They’ll also give detailed estimates and use Toyota-recommended parts. They’ll follow the manufacturer’s procedures for your vehicle model.
Dealership vs. Independent Shop Considerations
Toyota dealerships have factory-trained technicians and guaranteed OEM parts, but they’re often more expensive. They’re great for newer models and warranty work. Independent shops, on the other hand, offer similar quality at lower prices. They often have more flexibility in parts and provide better service.
Questions to Ask Your Mechanic
Before choosing a Toyota brake service, ask: “What specific brake components need attention and why?” Ask about parts quality and their warranties. Also, ask about their experience with your Toyota model. Finally, ask if they offer a post-service test drive to check the repair.
Performance Upgrades for Toyota Braking Systems
Toyota owners looking to go beyond the factory specs can find great benefits in aftermarket brake upgrades. While standard brakes are reliable for daily driving, those who love performance, track days, or mountain driving can see big improvements. Upgrading your brakes isn’t just about looks. It’s about safety, confidence, and enjoying your drive more.
High-Performance Pad Options
Brake pads are a great first upgrade for your Toyota. High-performance pads come in different materials, each with its own benefits:
Ceramic pads are quiet and clean, perfect for daily drivers who want better performance. Semi-metallic pads handle heat well and have a strong initial bite but can be noisier and wear rotors faster.
Racing pads are the most powerful but need high temperatures to work best. Choose pads based on your driving style and conditions. The right pads can make a big difference in pedal feel and confidence.
Upgraded Rotors for Better Stopping Power
Factory rotors are good for normal driving but can get hot during spirited driving. Upgraded rotors help cool down faster, reducing brake fade during hard stops.
Slotted rotors have grooves to clear gases and debris, improving wet-weather performance. Drilled rotors have holes for better cooling but might crack under extreme conditions.
Two-piece floating rotors separate the friction surface from the hub, allowing for better cooling without warping. They reduce unsprung weight and offer consistent performance. Many find slotted rotors a great balance between performance and durability.
Brake Line Enhancements
Replacing rubber brake lines with stainless steel braided lines is a great upgrade. Stainless lines don’t expand like rubber, giving a firmer pedal and better control.
This upgrade improves brake response and feedback, making hard stops more confident. It’s easy to install and doesn’t need special tools.
Brake line upgrades are especially good for older Toyotas where rubber lines may have worn out. With high-performance fluid, this upgrade makes your brakes more responsive and reliable.
| Upgrade Type | Cost Range | Performance Benefit | Installation Difficulty | Maintenance Impact |
|---|---|---|---|---|
| High-Performance Pads | $80-$200 | Moderate to High | Easy | May require more frequent replacement |
| Slotted/Drilled Rotors | $150-$400 | Moderate | Moderate | May collect more dust/debris |
| Two-Piece Rotors | $500-$1,200 | High | Moderate | Lower long-term maintenance |
| Stainless Brake Lines | $100-$250 | Moderate | Moderate | Virtually maintenance-free |
Conclusion
Your Toyota’s brakes are crucial for safety. Regular brake maintenance is not just a suggestion—it’s a must. It keeps you and your passengers safe on every trip.
We’ve looked at your Toyota’s braking system in this guide. It includes pads, rotors, calipers, and fluid. Each part is important for stopping your car safely. Ignoring any part can harm the whole system.
Keep an eye out for signs like squealing, vibrations, longer stops, and wear. These signs mean it’s time for a brake check. This can stop small problems from becoming big dangers.
Whether you do it yourself or take it to a Toyota expert, regular checks are important. Stick to Toyota’s service schedule for your car model. This helps your brakes last longer and saves you money on repairs.
By taking care of your brakes now, you’re making your future safer. Spend a bit of time this week checking your brakes. Check the fluid and listen for odd sounds. Your car will stop safely, every time.
FAQ
How often should I have my Toyota’s brakes inspected?
Toyota suggests brake checks every 5,000-7,500 miles or with each oil change. If you drive a lot in city traffic, mountains, or tow heavy, check brakes more often. Regular checks help find problems early and save money on repairs.
What’s the average lifespan of Toyota brake pads?
Toyota brake pads last 30,000-70,000 miles, depending on how you drive and the model. Front pads wear faster than rear ones. Hybrid models might last longer because of their regenerative braking.
How do I know when my Toyota needs new brake pads?
Watch for squealing when you brake, grinding sounds, or a pulsating brake pedal. Also, if stopping takes longer or a light comes on, it’s time. Check pads for at least 3-4mm of material left. If they’re thinner, you need new ones.
Can I replace just the front or rear brake pads on my Toyota?
Yes, you can replace just one set if needed. But always replace both front or rear pads together. This keeps your brakes balanced and prevents pulling when you brake.
What type of brake fluid does Toyota recommend?
Toyota usually needs DOT 3 or DOT 4 brake fluid, with newer cars often using DOT 4. Always check your manual for the right type. Never use DOT 5. Toyota says to change brake fluid every 2-3 years, no matter the miles.
Are aftermarket brake parts as good as Toyota OEM parts?
Quality varies with aftermarket parts. Some premium brands might be better, but budget options might not meet Toyota standards. For peace of mind, Toyota Genuine parts are made for your car and come with a warranty.
Why does my Toyota have a soft or spongy brake pedal?
A soft pedal means air in the lines, a leak, or a failing master cylinder. This is serious and needs quick attention. Other causes include worn pads, bad hoses, or brake booster issues. Get a pro to check it out to avoid longer stops.
How much does a complete Toyota brake job cost?
A full brake job for a Toyota costs 0-0 per axle, depending on your car and where you live. This includes new pads, rotors, and hardware. Adding extra services like caliper rebuilds or fluid flushes will cost more. Dealerships are pricier but offer Toyota-trained techs and genuine parts.
Can I just replace my Toyota’s brake pads without replacing the rotors?
You can, but it’s not always best. Check rotors for thickness and wear. If they’re okay, you can resurface them. But if they’re too thin or damaged, you must replace them with new pads.
Why do my Toyota’s brakes squeak even with new pads?
New pads might squeak during the first few hundred miles. If it keeps happening, it could be low-quality pads, bad installation, or dirty rotors. Using Toyota Genuine pads or high-quality aftermarket ones can help.
How long does a Toyota brake fluid flush take?
A brake fluid flush takes 45-90 minutes for a pro. It involves removing old fluid, adding new, and bleeding air. DIYers might take 2-3 hours. It’s important to do it right to ensure the system works well.
Are Toyota’s electronic parking brakes different to maintain?
Yes, newer Toyotas with electronic parking brakes need special care. You’ll need a scan tool or specific steps to replace rear pads. Don’t try to force the calipers back without disengaging the system. It’s best to have a pro do it.
What causes my Toyota to pull to one side when braking?
Pulling when you brake means uneven braking. It could be a stuck caliper, uneven pad wear, or contaminated pads. It could also be a brake hose issue or uneven rotors. This needs fixing fast to avoid unpredictable braking.
How do Toyota hybrid braking systems differ from conventional ones?
Toyota hybrids use regenerative braking to recharge the battery. This system works with traditional brakes. It means pads and rotors last longer. But, the system is complex, and brake fluid needs special care.